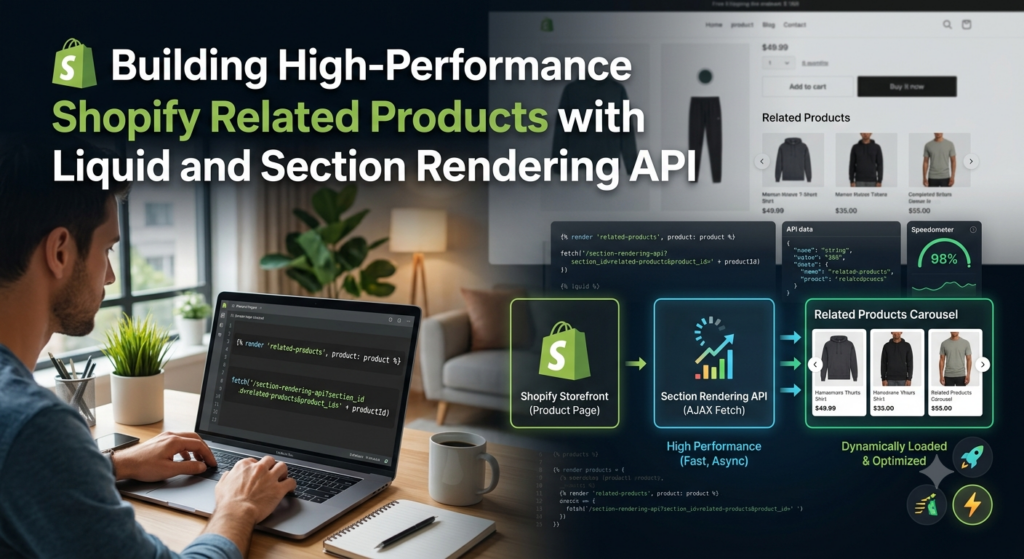
Product recommendation grids are standard on e-commerce product pages, but fetching recommended items server-side during initial page load can slow down total response time.
By offloading recommendation processing to Shopify’s asynchronous Recommendations API and returning HTML directly via the Section Rendering API, you achieve instant page loads without sacrificing functionality.
Here is a step-by-step breakdown of how to build an asynchronous, Online Store 2.0-compliant related-products.liquid section.
Architecture Overview: The Two-Pass Render
To keep the initial HTML payload lightweight, this section operates using a two-pass strategy:
-
Pass 1 (Initial Page Load): Server-side Liquid checks
recommendations.performed. Because no API fetch has occurred yet, it renders an empty container holdingdata-*attributes (product-id,limit,base-url). -
Pass 2 (Client-Side Async Fetch): JavaScript fires a
fetch()request targeting Shopify’s recommendations endpoint, appending the parametersection_id={{ section.id }}. Shopify processes the request, setsrecommendations.performedtotrue, renders the Liquid product grid, and sends back pure HTML to insert directly into the DOM.
       [ Client Browser ]                      [ Shopify Server ]
               |                                       |
               | --- 1. Initial Page Request --------> |
               | <--- 2. Returns Page + Empty Shell -- |
               |                                       |
  (DOM Loaded Triggered)                               |
               |                                       |
               | --- 3. GET /recommendations/products  |
               |        ?section_id=related-products   |
               |        &product_id=12345 --------->   |
               |                                       |
               | <--- 4. Returns Rendered Section HTML |
               |                                       |
 (Inject HTML into Container)
Step 1: Create the Liquid Section Shell
Create a new file in your theme directory at sections/related-products.liquid.
Add the core template markup:
<div
  class="related-products page-width section-{{ section.id }}-padding"
  data-base-url="{{ routes.product_recommendations_url }}"
  data-product-id="{{ product.id }}"
  data-limit="{{ section.settings.products_to_show }}"
>
  {%- if recommendations.performed and recommendations.products_count > 0 -%}
    <div class="related-products__header">
      <h2 class="related-products__heading {{ section.settings.heading_size }}">
        {{ section.settings.heading | escape }}
      </h2>
    </div>

    <ul class="related-products__grid grid grid--{{ section.settings.columns_desktop }}-col-desktop grid--{{ section.settings.columns_mobile }}-col-tablet-down" role="list">
      {%- for recommendation in recommendations.products -%}
        <li class="grid__item">
          {% render 'card-product',
            card_product: recommendation,
            show_vendor: section.settings.show_vendor,
            show_rating: section.settings.show_rating
          %}
        </li>
      {%- endfor -%}
    </ul>
  {%- else -%}
    <div class="related-products__placeholder" id="product-recommendations-{{ section.id }}"></div>
  {%- endif -%}
</div>
Key Components
-
routes.product_recommendations_url: Resolves cleanly to/recommendations/productsacross all store locales. -
recommendations.performed: Evaluates tofalseon initial render, dropping directly into the{%- else -%}block to display an empty anchor wrapper. -
{% render 'card-product' %}: Leverages your theme’s existing product card snippet to maintain visual consistency.
Step 2: Implement Client-Side Fetch Engine
Directly under the section markup in sections/related-products.liquid, add the JavaScript execution block:
<script>
  document.addEventListener('DOMContentLoaded', function () {
    const container = document.querySelector('.related-products[data-product-id]');
    if (!container) return;

    const productId = container.dataset.productId;
    const limit = container.dataset.limit;
    const baseUrl = container.dataset.baseUrl;

    // Combining Shopify Liquid section ID with client-side query string parameters
    const requestUrl = `${baseUrl}?section_id={{ section.id }}&product_id=${productId}&limit=${limit}`;

    fetch(requestUrl)
      .then(response => response.text())
      .then(html => {
        const wrapper = document.createElement('div');
        wrapper.innerHTML = html;
        const recommendations = wrapper.querySelector('.related-products');

        if (recommendations && recommendations.innerHTML.trim().length > 0) {
          container.innerHTML = recommendations.innerHTML;
        }
      })
      .catch(e => console.error('Error loading product recommendations:', e));
  });
</script>
Why Section Rendering API?
Standard API requests return JSON payloads that require client-side string templating or heavy JavaScript rendering frameworks.
By passing section_id={{ section.id }} in the query string, Shopify executes the section’s Liquid logic server-side and returns ready-to-inject HTML markup. This eliminates client-side rendering overhead and keeps bundle sizes minimal.
Step 3: Add Scoped Dynamic CSS
Append responsive styles directly within the section using Liquid variable binding to dynamically apply customizer settings:
<style>
  .section-{{ section.id }}-padding {
    padding-top: {{ section.settings.padding_top }}px;
    padding-bottom: {{ section.settings.padding_bottom }}px;
  }
  .related-products__grid {
    display: grid;
    gap: 1.5rem;
    list-style: none;
    padding: 0;
  }
  .grid--4-col-desktop {
    grid-template-columns: repeat(4, 1fr);
  }
  .grid--3-col-desktop {
    grid-template-columns: repeat(3, 1fr);
  }
  @media screen and (max-width: 749px) {
    .grid--2-col-tablet-down {
      grid-template-columns: repeat(2, 1fr);
    }
    .grid--1-col-tablet-down {
      grid-template-columns: 1fr;
    }
  }
</style>
Step 4: Configure Theme Editor Settings Schema
Add the schema definition at the bottom of the file to configure user settings in the Shopify Theme Customizer:
{% schema %}
{
  "name": "Related Products",
  "tag": "section",
  "class": "section",
  "settings": [
    {
      "type": "text",
      "id": "heading",
      "default": "You may also like",
      "label": "Heading"
    },
    {
      "type": "select",
      "id": "heading_size",
      "options": [
        { "value": "h3", "label": "Small" },
        { "value": "h2", "label": "Medium" },
        { "value": "h1", "label": "Large" }
      ],
      "default": "h2",
      "label": "Heading size"
    },
    {
      "type": "range",
      "id": "products_to_show",
      "min": 2,
      "max": 10,
      "step": 1,
      "default": 4,
      "label": "Maximum products to show"
    },
    {
      "type": "range",
      "id": "columns_desktop",
      "min": 2,
      "max": 5,
      "step": 1,
      "default": 4,
      "label": "Number of columns on desktop"
    },
    {
      "type": "select",
      "id": "columns_mobile",
      "options": [
        { "value": "1", "label": "1 column" },
        { "value": "2", "label": "2 columns" }
      ],
      "default": "2",
      "label": "Number of columns on mobile"
    },
    {
      "type": "checkbox",
      "id": "show_vendor",
      "default": false,
      "label": "Show product vendor"
    },
    {
      "type": "checkbox",
      "id": "show_rating",
      "default": false,
      "label": "Show product rating"
    },
    {
      "type": "header",
      "content": "Section Padding"
    },
    {
      "type": "range",
      "id": "padding_top",
      "min": 0,
      "max": 100,
      "step": 4,
      "unit": "px",
      "label": "Top padding",
      "default": 36
    },
    {
      "type": "range",
      "id": "padding_bottom",
      "min": 0,
      "max": 100,
      "step": 4,
      "unit": "px",
      "label": "Bottom padding",
      "default": 36
    }
  ],
  "presets": [
    {
      "name": "Related Products"
    }
  ]
}
{% endschema %}
Best Practices & Performance Checklist
-
Avoid Layout Shift (CLS): Reserve vertical space on the product page using CSS minimum height rules on
.related-products__placeholderto prevent content jumping when recommended items load. -
Intersection Observer Optimization: For additional speed gains, wrap the fetch script inside an
IntersectionObserver. This ensures the network request fires only when the user scrolls near the recommendations section. -
Theme Customizer Compatibility: Include
"presets"within your schema so store administrators can position this section anywhere on OS 2.0 product templates (templates/product.json).
Coding Quote of the Day:
“The best code is no code at all.”
— Jeff Atwood
Useful links below:
Let me & my team build you a money making website/blog for your business https://bit.ly/tnrwebsite_service
Get Bluehost hosting for as little as $1.99/month (save 75%)…https://bit.ly/3C1fZd2
Best email marketing automation solution on the market! http://www.aweber.com/?373860
Build high converting sales funnels with a few simple clicks of your mouse! https://bit.ly/484YV29
Join my Patreon for one-on-one coaching and help with your coding…https://www.patreon.com/c/TyronneRatcliff
Buy me a coffee  https://buymeacoffee.com/tyronneratcliff