
In the early days of cloud computing, “Public IP with a firewall” was the standard.
In 2026, that’s considered a legacy risk.
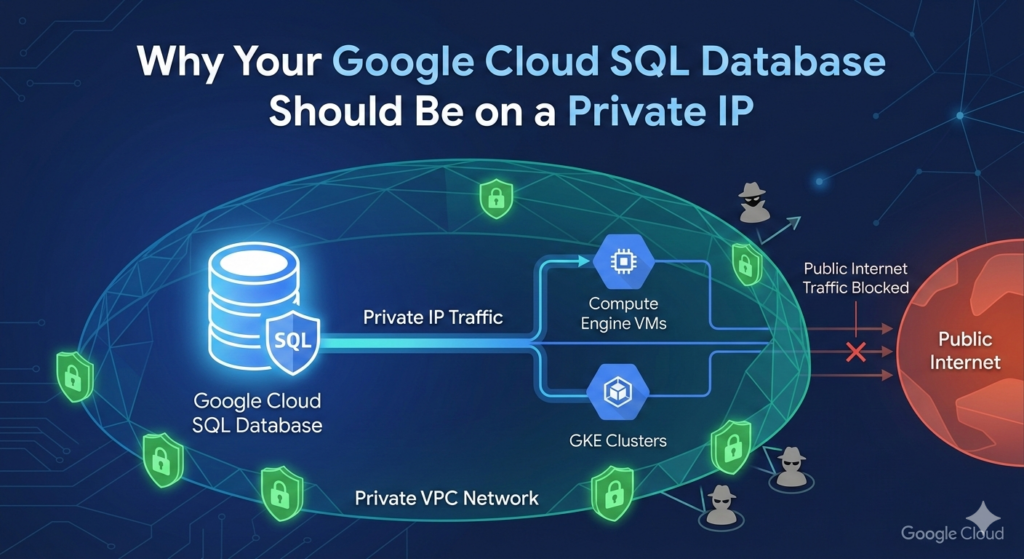
If you’re running Cloud SQL (PostgreSQL, MySQL, or SQL Server) on Google Cloud, switching to Private IP is one of the most impactful changes you can make for both your security posture and your resource efficiency.
1. Eliminate the “Noise” of the Public Internet
Every public IP on GCP is a target for constant, automated probing. Even if your Authorized Networks are configured correctly, your database instance still has to process the network overhead of thousands of rejected connection attempts.
By using Private Service Access, your database lives entirely within your VPC (Virtual Private Cloud).
-
The Security Gain: It literally has no public DNS record or route. It is invisible to anyone outside your project.
-
The Resource Gain: Your CPU doesn’t waste a single cycle on “handshaking” with malicious bots from across the globe.
2. Performance: Staying on the “Google Fiber”
When you use a Public IP, traffic can sometimes route through external gateways, even if the source is another GCP resource.
-
Lower Latency: Private IP traffic stays on Google’s internal, software-defined network. This ensures sub-millisecond latency between your GKE clusters or Compute Engine instances and your database.
-
Higher Throughput: You aren’t competing with public internet congestion. Your data moves through Google’s dedicated backbone, which is optimized for high-volume database workloads.
3. Cost Savings on Egress
One of the “silent killers” of a GCP budget is Network Egress fees.
-
Traffic between a VM and a Cloud SQL instance via a Public IP—even in the same region—can sometimes trigger egress charges depending on your routing setup.
-
Private IP traffic within the same region is generally free, and inter-zone traffic is significantly cheaper and more predictable.
4. The “Defense in Depth” Synergy
On GCP, Private IP allows you to leverage VPC Service Controls (VPC-SC).
This creates a security perimeter that prevents data exfiltration. Even if an attacker steals a service account key, VPC-SC can block them from accessing the database if they aren’t “inside” your trusted network.
How to Transition Safely on GCP
-
Enable the Service Networking API: This is required for Google to create the “VPC Peering” connection between your network and the Google-managed service network.
-
Use the Cloud SQL Auth Proxy: Even with a Private IP, use the Auth Proxy. It handles IAM-based authentication, meaning you don’t have to manage static database passwords in your code.
-
Set Up a Bastion Host: Since your DB no longer has a public IP, you’ll need a small “Jump Box” (e2-micro) or IAP (Identity-Aware Proxy) to run manual queries from your local machine.
The Bottom Line
In Google Cloud, a public IP on a database is an unnecessary “door” to your data.
By moving to a Private IP, you reduce your attack surface to zero, lower your latency, and stop wasting CPU cycles on the background noise of the internet.
Useful links below:
Let me & my team build you a money making website/blog for your business https://bit.ly/tnrwebsite_service
Get Bluehost hosting for as little as $1.99/month (save 75%)…https://bit.ly/3C1fZd2
Best email marketing automation solution on the market! http://www.aweber.com/?373860
Build high converting sales funnels with a few simple clicks of your mouse! https://bit.ly/484YV29
Join my Patreon for one-on-one coaching and help with your coding…https://www.patreon.com/c/TyronneRatcliff
Buy me a coffee  https://buymeacoffee.com/tyronneratcliff


