≡ Menu

Have you ever built an interactive web page, only to find your JavaScript becoming a tangled mess of event listeners?

Or perhaps you’ve struggled with handling clicks on dynamically added content? If so, it’s time to unlock the power of Event Delegation.

Event delegation is a fundamental pattern in web development that can drastically improve the performance, memory footprint, and maintainability of your JavaScript applications. Let’s dive in!

What’s the Problem Event Delegation Solves?


Imagine you have a long list of items, and you want to do something specific (like show an alert) when any of those items are clicked. Your first thought might be to attach a click listener to every single list item:


// A less optimal approach (without delegation):
document.querySelectorAll('.list-item').forEach(item => {
    item.addEventListener('click', function(event) {
        alert('Clicked: ' + event.target.textContent);
    });
});

While this works, it has a few drawbacks:

  1. Memory Overhead: For a list with 100 items, you’re creating 100 separate event listeners. That’s a lot of objects for the browser to keep track of.
  2. Performance on Load: The browser has to iterate through all elements and attach these listeners when the page loads, which can impact initial rendering time.
  3. Dynamic Content Issues: What happens if you add new list items after the page has loaded? These new items won’t have any listeners attached, and your code will fail to react to their clicks!

This is where Event Delegation shines.

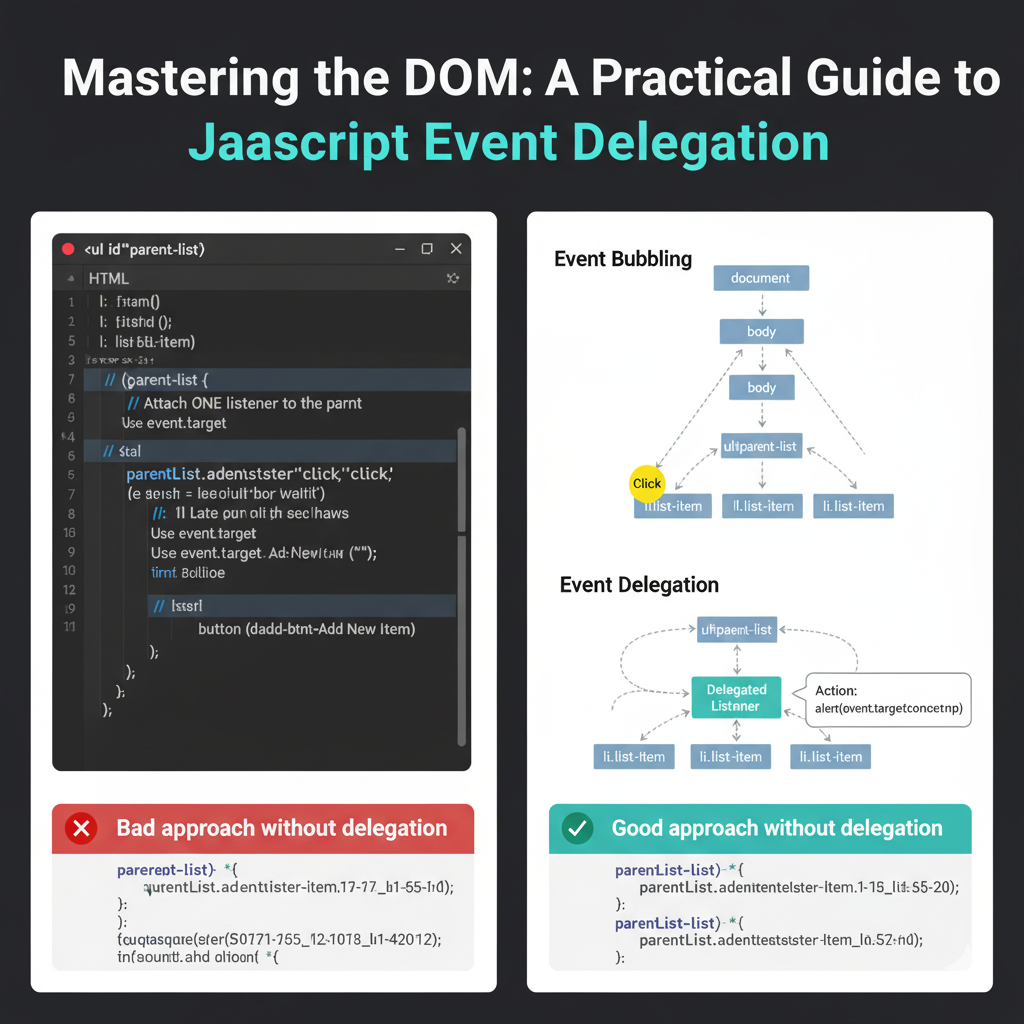
The Power of Event Bubbling


Before we get to the solution, a quick word on event bubbling. When an event (like a click) occurs on an element, it doesn’t just happen on that element. It also “bubbles up” through its ancestors in the DOM tree. So, a click on a <li> also triggers a click event on its parent <ul>, its parent <body>, and so on, all the way up to the document object.

Event delegation leverages this bubbling mechanism.

How Event Delegation Works


Instead of attaching a listener to every child element, you attach a single event listener to a common ancestor element. When an event occurs on one of the children, it bubbles up to this ancestor. The ancestor’s listener then “catches” the event and, using the event.target property, determines which specific child element was originally clicked.

Let’s illustrate with a practical example:

Our HTML Structure


Consider a simple unordered list and a button to add new items dynamically:

<ul id="parent-list">
  <li class="list-item">Item 1</li>
  <li class="list-item">Item 2</li>
  <li class="list-item">Item 3</li>
  <li class="list-item">Item 4</li>
</ul>
<button id="add-btn">Add New Item</button>

JavaScript Implementation (Using Event Delegation)

// 1. Get the parent element where we'll attach our single listener
const parentList = document.getElementById('parent-list');
const addButton = document.getElementById('add-btn');

// 2. Attach ONE listener to the parent (the <ul> element)
parentList.addEventListener('click', function(event) {
  // 3. Check if the clicked element (event.target) matches the children we care about
  //    The `matches()` method is perfect for this.
  if (event.target && event.target.matches('.list-item')) {
    // 4. Perform the desired action
    alert('Clicked item text: ' + event.target.textContent);
    // You can add more complex logic here, perhaps using data attributes:
    // const itemId = event.target.dataset.id;
    // console.log(`Item with ID ${itemId} was clicked!`);
  }
});

// Example: Dynamically adding new items
let itemCount = 5;
addButton.addEventListener('click', () => {
  const newItem = document.createElement('li');
  newItem.className = 'list-item';
  newItem.textContent = 'Item ' + itemCount;
  parentList.appendChild(newItem);
  itemCount++;
  
  // Notice: We do NOT need to add a new event listener for `newItem`!
  // The delegated listener on `parentList` will automatically handle clicks on it.
});


Why This Is Better


  • Efficiency: Only one event listener is active for the entire list, regardless of how many items it contains.
  • Future-Proof: Any new <li> elements added to parent-list (even dynamically) will automatically be covered by the existing delegated listener. No need to re-attach listeners!
  • Cleaner Code: Your JavaScript stays much tidier without loops creating multiple identical listeners.


When to Use Event Delegation


Event delegation is an excellent choice for:

  • Large lists or tables: Where you have many similar, interactive elements.
  • Dynamically loaded content: When content is added, removed, or changed via AJAX or user interaction.
  • Performance-critical applications: To minimize memory usage and improve responsiveness.

Conclusion


Event delegation is a powerful, elegant solution to common challenges in DOM manipulation. By understanding event bubbling and strategically placing your listeners, you can write more efficient, performant, and maintainable JavaScript. Start delegating your events today and experience a smoother, more robust web application!

{ 0 comments }

How to Build a Pagination Feature In React 🚀

Managing large datasets in your React application can slow down performance and overwhelm your users.

The solution?

Pagination!

Instead of rendering a massive list all at once, you show a manageable chunk, improving both speed and user experience.

In this tutorial, we’ll walk through a complete, clean React component that fetches data using the native Fetch API (no bulky third-party libraries needed!) and implements robust pagination logic. We’ll use the JSONPlaceholder API for our dummy data.


1. Setting Up the State and Imports

We’ll start with the necessary imports from React and define the initial state for our data, pagination settings, and current page.

import React, { useState, useEffect } from 'react';

const App = () => {
  // todos: Holds the full array of data fetched from the API
  const [todos, setTodos] = useState([]);
  
  // todosPerPage: Determines how many items show on one page
  const [todosPerPage] = useState(10); 
  
  // currentPage: Tracks which page the user is currently viewing
  const [currentPage, setCurrentPage] = useState(1);

  // ... rest of the component

2. Fetching Data with useEffect and Fetch API

We use the useEffect hook to fetch the data only once when the component mounts. Notice how we’re using the native fetch API, which is a modern, built-in alternative to older libraries like Axios.

💡 Fetch API Tip: Unlike Axios, the native fetch returns a raw response object, so you must explicitly call .json() on the response to parse the body into a JavaScript object.

  // Fetch data only once on mount
  useEffect(() => {
    // ⬇️ Using the native Fetch API 
    fetch("https://jsonplaceholder.typicode.com/todos")
      .then((res) => res.json()) // 1. Convert the raw response to JSON
      .then((data) => setTodos(data)) // 2. Use the JSON data to update state
      .catch((error) => console.error("Error fetching todos:", error)); // 3. Error handling is crucial!
  }, []); // The empty array dependency ensures it runs only once.

3. Implementing the Core Pagination Logic

The magic of pagination happens here. We need three key pieces of information to determine what to show:

  1. Total number of pages: Found by dividing the total items by items per page and rounding up using Math.ceil().
  2. Indices for slicing: We calculate the starting (indexOfFirstTodo) and ending (indexOfLastTodo) indices for the array slice based on the current page.
  3. The visible data: We use the array’s .slice() method to extract only the items for the current page.
// --- Pagination Logic ---
  // Calculate total pages needed
  const numOfTotalPages = Math.ceil(todos.length / todosPerPage);
  
  // Create an array of page numbers: [1, 2, 3, ..., numOfTotalPages]
  const pages = [...Array(numOfTotalPages + 1).keys()].slice(1);

  // Calculate the index range for the current page's slice
  const indexOfLastTodo = currentPage * todosPerPage;
  const indexOfFirstTodo = indexOfLastTodo - todosPerPage;

  // Slice the full todos array to get only the items for the current view
  const visibleTodos = todos.slice(indexOfFirstTodo, indexOfLastTodo);

  // ... rest of the component

4. Navigation Handlers

We’ll create simple functions to handle clicking the “Prev” and “Next” buttons, ensuring the page number doesn’t go below 1 or above the total number of pages.

  // --- Handlers ---
  const prevPageHandler = () => {
    // Only allow navigating back if not on the first page
    if (currentPage !== 1) setCurrentPage(currentPage - 1);
  };

  const nextPageHandler = () => {
    // Only allow navigating forward if not on the last page
    if (currentPage !== numOfTotalPages) setCurrentPage(currentPage + 1);
  };

5. Rendering the UI and Controls

Finally, we render the data and the pagination controls. We use the visibleTodos array for the main list and the pages array for generating the clickable page numbers.

  return (
    <div>
      <h2>Todo List (Page {currentPage})</h2>
      
      {/* Display a loading message while todos are empty */}
      {todos.length === 0 ? (
        <p>Loading todos...</p>
      ) : (
        /* MAP OVER THE VISIBLE TODOS ONLY */
        visibleTodos.map((todo) =>
          <p key={todo.id}>
            **{todo.id}**: {todo.title} 
            {/* Optional: Show status based on 'completed' property */}
          </p>
        )
      )}

      <hr />

      {/* PAGINATION CONTROLS */}
      <span 
        onClick={prevPageHandler}
        // Disable 'Prev' button visually and functionally on page 1
        style={{ cursor: currentPage === 1 ? 'not-allowed' : 'pointer' }}
      >
        Prev
      </span>
      
      <p>
        {pages.map((page) => (
          <span
            key={page}
            onClick={() => setCurrentPage(page)}
            className={`${currentPage === page ? "active" : ""}`} 
            style={{ 
              margin: '0 5px', 
              fontWeight: currentPage === page ? 'bold' : 'normal',
              cursor: 'pointer'
            }}
          >
            {`${page} | `}
          </span>
        ))}
      </p>

      <span 
        onClick={nextPageHandler}
        // Disable 'Next' button visually and functionally on the last page
        style={{ cursor: currentPage === numOfTotalPages ? 'not-allowed' : 'pointer' }}
      >
        Next
      </span>
      
      {/* A simple style for the active class for demonstration */}
      <style>{`
        .active {
          color: blue;
          text-decoration: underline;
        }
      `}</style>
    </div>
  );
};

export default App;

Full Code Summary

Here is the complete code for your App.js component:

import React, { useState, useEffect } from 'react';

const App = () => {
  const [todos, setTodos] = useState([]);
  const [todosPerPage] = useState(10); 
  const [currentPage, setCurrentPage] = useState(1);

  // Fetch data only once on mount
  useEffect(() => {
    fetch("https://jsonplaceholder.typicode.com/todos")
      .then((res) => res.json()) 
      .then((data) => setTodos(data)) 
      .catch((error) => console.error("Error fetching todos:", error)); 
  }, []);

  // --- Pagination Logic ---
  const numOfTotalPages = Math.ceil(todos.length / todosPerPage);
  const pages = [...Array(numOfTotalPages + 1).keys()].slice(1);

  const indexOfLastTodo = currentPage * todosPerPage;
  const indexOfFirstTodo = indexOfLastTodo - todosPerPage;

  const visibleTodos = todos.slice(indexOfFirstTodo, indexOfLastTodo);

  // --- Handlers ---
  const prevPageHandler = () => {
    if (currentPage !== 1) setCurrentPage(currentPage - 1);
  };

  const nextPageHandler = () => {
    if (currentPage !== numOfTotalPages) setCurrentPage(currentPage + 1);
  };

  return (
    <div>
      <h2>Todo List (Page {currentPage})</h2>
      
      {/* Display a loading message while todos are empty */}
      {todos.length === 0 ? (
        <p>Loading todos...</p>
      ) : (
        /* MAP OVER THE VISIBLE TODOS ONLY */
        visibleTodos.map((todo) =>
          <p key={todo.id}>**{todo.id}**: {todo.title}</p>
        )
      )}

      <hr />

      {/* PAGINATION CONTROLS */}
      <span 
        onClick={prevPageHandler}
        style={{ cursor: currentPage === 1 ? 'not-allowed' : 'pointer' }}
      >
        Prev
      </span>
      
      <p>
        {pages.map((page) => (
          <span
            key={page}
            onClick={() => setCurrentPage(page)}
            className={`${currentPage === page ? "active" : ""}`} 
            style={{ 
              margin: '0 5px', 
              fontWeight: currentPage === page ? 'bold' : 'normal',
              cursor: 'pointer'
            }}
          >
            {`${page} | `}
          </span>
        ))}
      </p>

      <span 
        onClick={nextPageHandler}
        style={{ cursor: currentPage === numOfTotalPages ? 'not-allowed' : 'pointer' }}
      >
        Next
      </span>
      
      {/* A simple style for the active class for demonstration */}
      <style>{`
        .active {
          color: blue;
          text-decoration: underline;
        }
      `}</style>
    </div>
  );
};

export default App;

This setup provides a clean, efficient, and library-free way to handle both data fetching and client-side pagination in your React applications! Happy coding! 💻

{ 0 comments }