≡ Menu

JavaScript, like many programming languages, provides ways to store data in memory using variables.

However, the evolution of JavaScript has introduced different keywords for declaring variables, each with its own nuances and implications.

For newcomers and seasoned developers alike, understanding the distinctions between var, let, and const is crucial for writing clean, predictable, and maintainable code.

Let’s dive into the core differences:

1. var: The Old Guard (and Its Quirks)

var was the original way to declare variables in JavaScript. While still functional, it comes with a few characteristics that can lead to unexpected behavior if not understood.

Function Scope: Variables declared with var are function-scoped. This means they are accessible anywhere within the function they are declared in, regardless of block statements (like if statements or for loops).

function exampleVar() {
  if (true) {
    var x = 10;
  }
  console.log(x); // Output: 10 (accessible outside the if block)
}
exampleVar();

console.log(x); // Error: x is not defined (not accessible outside the function)

Hoisting: var declarations are “hoisted” to the top of their function scope. This means that you can use a var variable before it’s actually declared in the code, although its value will be undefined until the declaration is reached.

function hoistExample() {
  console.log(y); // Output: undefined
  var y = 20;
  console.log(y); // Output: 20
}
hoistExample();

Re-declaration and Re-assignment: var allows for both re-declaration and re-assignment within the same scope without error. This can sometimes lead to accidental overwriting of variables.

var name = "Alice";
var name = "Bob"; // No error, 'name' is re-declared
console.log(name); // Output: Bob

var age = 30;
age = 31; // Re-assigned
console.log(age); // Output: 31

Global Object Property: When declared outside of any function, var variables become properties of the global window object (in browsers).

var globalVar = "I'm global!";
console.log(window.globalVar); // Output: I'm global!

2. let: The Modern, Block-Scoped Variable

Introduced in ECMAScript 2015 (ES6), let addresses many of the shortcomings of var. It’s now the preferred way to declare variables when you expect their values to change.

Block Scope: The most significant difference is that let variables are block-scoped. A block is any code enclosed in curly braces {} (e.g., if statements, for loops, while loops, or simply a standalone block).

function exampleLet() {
  if (true) {
    let x = 10;
    console.log(x); // Output: 10
  }
  // console.log(x); // Error: x is not defined (not accessible outside the if block)
}
exampleLet();

No Re-declaration (within the same scope): You cannot re-declare a let variable within the same block scope. This helps prevent accidental overwriting.

let city = "New York";
// let city = "London"; // Error: Identifier 'city' has already been declared
city = "London"; // This is allowed (re-assignment)
console.log(city); // Output: London

Hoisting (but with a “Temporal Dead Zone”): While let declarations are technically hoisted, they are not initialized. Accessing a let variable before its declaration results in a ReferenceError. This period is known as the “Temporal Dead Zone” (TDZ).

function tdzExample() {
  // console.log(a); // Error: Cannot access 'a' before initialization
  let a = 1;
  console.log(a); // Output: 1
}
tdzExample();

Not a Global Object Property: Unlike var, let variables declared globally do not become properties of the window object.

3. const: For Unchangeable Values

Also introduced in ES6, const is used to declare constants – values that, once assigned, cannot be re-assigned.

Block Scope: Like let, const variables are block-scoped.

function exampleConst() {
  const PI = 3.14159;
  if (true) {
    const GREETING = "Hello";
    console.log(GREETING); // Output: Hello
  }
  // console.log(GREETING); // Error: GREETING is not defined
}
exampleConst();

No Re-assignment: This is the defining characteristic of const. Once a value is assigned, you cannot change it.

const BIRTH_YEAR = 1990;
// BIRTH_YEAR = 1991; // Error: Assignment to constant variable.

Initialization Required: You must assign a value to a const variable at the time of its declaration.

// const MY_CONSTANT; // Error: Missing initializer in const declaration
const MY_CONSTANT = "Some Value";

Caveat with Objects and Arrays: While you cannot re-assign a const variable that holds an object or an array, you can modify the properties of the object or the elements of the array. The const declaration only prevents re-assignment of the binding itself, not the internal contents of the bound value.

const person = {
  name: "John",
  age: 30
};
person.age = 31; // Allowed
console.log(person); // Output: { name: 'John', age: 31 }

// person = { name: "Jane" }; // Error: Assignment to constant variable.

const numbers = [1, 2, 3];
numbers.push(4); // Allowed
console.log(numbers); // Output: [1, 2, 3, 4]

// numbers = [5, 6]; // Error: Assignment to constant variable.

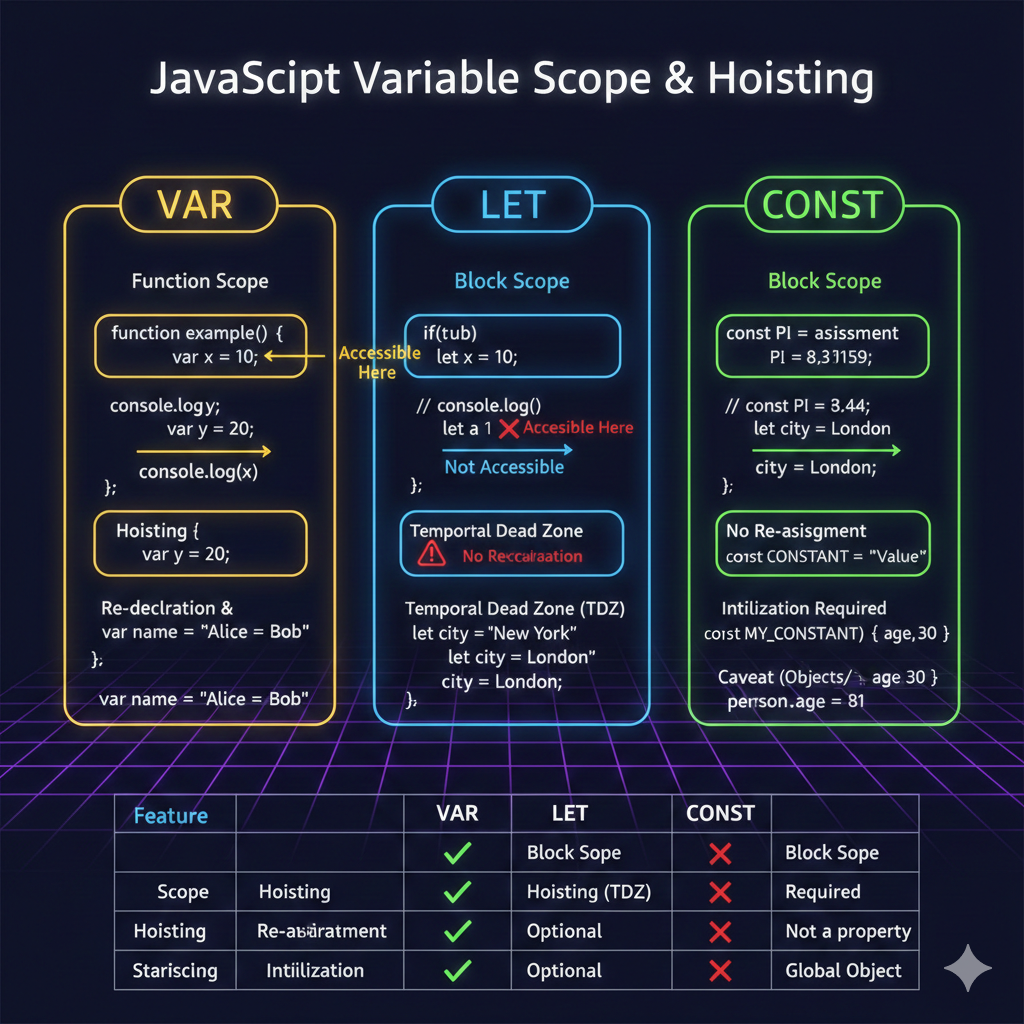
Quick Comparison Table

Feature var let const
Scope Function Scope Block Scope Block Scope
Hoisting Yes Yes (TDZ) Yes (TDZ)
Re-declaration Yes No No
Re-assignment Yes Yes No
Initialization Optional Optional Required
Global Object Property Not a property Not a property

When to Use Which?

  • const (Default Choice): If you can, always start with const. It enforces immutability for the variable’s binding, which helps prevent accidental re-assignments and makes your code more predictable. Only if you know the value will change, move to let.

  • let (When Value Changes): Use let when you declare a variable whose value is expected to change over time, such as a counter in a loop, a user’s input that might be updated, or a temporary variable that holds different values throughout a function’s execution.

  • var (Avoid, If Possible): In modern JavaScript development, it’s generally recommended to avoid var. Its function scoping and hoisting behavior can lead to subtle bugs and make code harder to reason about. Most linters will even warn you about its usage.

By adopting let and const, you embrace best practices that lead to more robust, readable, and less error-prone JavaScript code.

Happy coding!

Useful links below:

Let me & my team build you a money making website/blog for your business https://bit.ly/tnrwebsite_service

Get Bluehost hosting for as little as $1.99/month (save 75%)…https://bit.ly/3C1fZd2

Best email marketing automation solution on the market! http://www.aweber.com/?373860

Build high converting sales funnels with a few simple clicks of your mouse! https://bit.ly/484YV29

Join my Patreon for one-on-one coaching and help with your coding…https://www.patreon.com/c/TyronneRatcliff

Buy me a coffee ☕️https://buymeacoffee.com/tyronneratcliff

{ 0 comments }

🚨 CRITICAL SECURITY ALERT: Immediate Action Required for Next.js Users

Before diving into how to use Next.js Server Actions, you must first immediately verify and update your Next.js version to protect your application from a critical vulnerability.

The Exploit

A maximum-severity Remote Code Execution (RCE) vulnerability (CVE-2025-55182 / CVE-2025-66478, known as “React2Shell”) has been disclosed in the underlying React Server Components (RSC) “Flight” protocol.

This flaw is particularly relevant to Server Actions because it affects how the server deserializes attacker-controlled data sent to Server Function endpoints.

An unauthenticated attacker can send a specially crafted HTTP request to execute arbitrary code on the server. This is a critical risk, and exploitation has been observed in the wild.

Affected Next.js Versions

Next.js applications using the App Router are affected in the following release lines:

  • Next.js 15.x

  • Next.js 16.x

  • Next.js 14.3.0-canary.77 and later canary releases.

(If you are using the Pages Router or a stable Next.js 14.x version older than the affected canaries, you are not affected by this specific vulnerability.)

What You Must Do NOW

You need to upgrade your dependencies to a patched version immediately.

  1. Upgrade: Run the following command or update your package.json to a fixed version:

    • 15.x users: Upgrade to 15.0.5 or higher.

    • 16.x users: Upgrade to 16.0.7 or higher.

    • Canary users: Downgrade to the latest stable 14.x release or update to a patched canary version like 15.6.0-canary.58.npm install next@<patched-version>
  2. Rotate Secrets: If your application was online and unpatched, it is strongly recommended to rotate all application secrets, starting with critical ones (API keys, database credentials, etc.), as the RCE could have allowed an attacker to exfiltrate them.

  3. Use Official Tool: Vercel has provided an official interactive tool to help update affected apps:npx fix-react2shell-next

Please stop here, check your version, and apply the patch before continuing with this guide.

Your application’s security is paramount!

Now on to my blog post.

Handling user authentication is central to almost every modern web application.

For years, this meant writing separate API routes (like /api/login), managing fetch calls on the client, and juggling loading states.

Thanks to the App Router and React Server Components (RSC), Next.js now offers a dramatically simpler and more powerful solution: Server Actions (or React Server Functions).

In this post, we’ll walk through how to create a production-ready login form that is secure, performs fast, and offers progressive enhancement out of the box.


What are Next.js Server Actions?

Server Actions allow you to run server-side code (like database queries, mutations, or authentication logic) directly from a client-side component.

They are the new standard for data mutations in Next.js, eliminating the need for boilerplate API endpoints.

Key Benefits:

  • Security: Your sensitive server code (database credentials, secrets) never leaves the server and is never included in the client’s JavaScript bundle.

  • Progressive Enhancement: Forms submitted via a Server Action work even when JavaScript is disabled.

  • Simplicity: You replace complex fetch logic with a simple function call.


Step-by-Step Tutorial: Login Form Implementation

We will break this down into three files: the server logic, the interactive client component, and the final page.

1. Define the Server Action (src/actions/auth.js)

This file contains the critical authentication logic. The mandatory 'use server' directive at the top tells Next.js and the React Flight Protocol to keep this code confined to the server.

// src/actions/auth.js

'use server'; // 👈 MANDATORY: Marks all exports as Server Actions

import { redirect } from 'next/navigation';

export async function loginAction(formData) {
  // 1. Extract data from the native FormData object
  const email = formData.get('email');
  const password = formData.get('password');

  // --- Real-world Logic Goes Here ---
  
  // NOTE: Replace this placeholder with secure credential validation (e.g., comparing
  // hashed passwords against a database record).

  if (email === 'user@example.com' && password === 'password123') {
    // 2. Successful Login: Set Session/Cookie
    console.log(`User ${email} logged in successfully!`);
    
    // In a real application, you would create and set an encrypted session cookie here.
    // e.g., await createSession(userId);

    // 3. Use Next.js redirect to send the user to the dashboard
    redirect('/dashboard'); 
    
  } else {
    // 4. Failed Login: Return an error object
    console.error(`Login failed for ${email}`);
    
    // The client component will handle this returned object
    return { 
      error: 'Invalid credentials. Please check your email and password.',
      success: false 
    };
  }
}

2. Create the Client Component (src/components/LoginForm.jsx)

Although the logic runs on the server, we need a Client Component to handle user input, interactive loading states, and display error messages. We use the special useFormStatus hook to manage the form’s submission state seamlessly.

// src/components/LoginForm.jsx

'use client'; // 👈 Mandatory for interactive hooks like useState and useFormStatus

import React from 'react';
import { useFormStatus } from 'react-dom'; 
import { loginAction } from '@/actions/auth'; // Import your Server Action

// --- Helper Component for Loading State ---
function SubmitButton() {
  // useFormStatus monitors the status of the form it's contained within
  const { pending } = useFormStatus(); 

  return (
    <button 
      type="submit" 
      aria-disabled={pending} 
      disabled={pending}
    >
      {pending ? 'Logging in...' : 'Log In'}
    </button>
  );
}

// --- Main Login Form Component ---
export default function LoginForm() {
  const [errorMessage, setErrorMessage] = React.useState(null); 

  // Client-side wrapper to call the Server Action and handle its return value
  async function handleFormSubmit(formData) {
    setErrorMessage(null); 
    
    // 1. Call the imported Server Action directly
    const result = await loginAction(formData); 
    
    // 2. Check the return object for errors
    if (result && result.error) {
      setErrorMessage(result.error);
    }
    // Note: If login is successful, the server performs the redirect, 
    // so no 'else' logic is needed here.
  }

  return (
    // We pass our wrapper function to the 'action' prop
    <form action={handleFormSubmit} className="login-form">
      <h2>Login to Your Account</h2>
      
      {errorMessage && <p style={{ color: 'red', fontWeight: 'bold' }}>{errorMessage}</p>}

      <label htmlFor="email">Email:</label>
      <input type="email" id="email" name="email" required />

      <label htmlFor="password">Password:</label>
      <input type="password" id="password" name="password" required />
      
      <SubmitButton />
    </form>
  );
}

3. Assemble the Page (src/app/login/page.js)

Finally, we simply render the component on our page.

// src/app/login/page.js (Default Server Component)

import LoginForm from '@/components/LoginForm';

export default function LoginPage() {
  return (
    <main style={{ maxWidth: '400px', margin: '50px auto' }}>
      <h1>Secure Login</h1>
      <LoginForm />
    </main>
  );
}

🚀 The Power of useFormStatus

The useFormStatus hook is the true game-changer here. Notice how we didn’t write any try...catch blocks or manually manage a setLoading(true) state for the submit button.

The useFormStatus hook automatically detects when the form is submitting data to the Server Action and sets the pending state to true, providing a smooth, built-in loading experience for the user.


This pattern—defining business logic on the server and calling it directly from an interactive client form—is the recommended way to handle mutations in modern Next.js applications.

Useful links below:

Let me & my team build you a money making website/blog for your business https://bit.ly/tnrwebsite_service

Get Bluehost hosting for as little as $1.99/month (save 75%)…https://bit.ly/3C1fZd2

Best email marketing automation solution on the market! http://www.aweber.com/?373860

Build high converting sales funnels with a few simple clicks of your mouse! https://bit.ly/484YV29

Join my Patreon for one-on-one coaching and help with your coding…https://www.patreon.com/c/TyronneRatcliff

Buy me a coffee ☕️https://buymeacoffee.com/tyronneratcliff

{ 0 comments }